
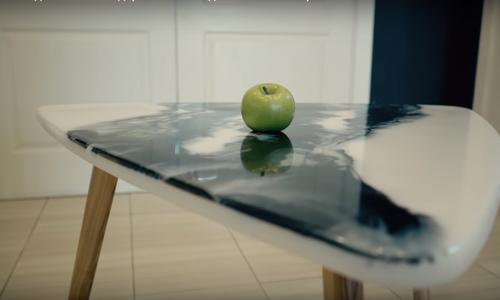
Epoxy resin furniture is very popular today, and it may seem like it would be a no-brainer to make. But in reality, this composition requires specific knowledge and careful preparation. I suggest you make a stylish table from epoxy – and in the process I’ll tell you about the nuances of working with it. Stylish table made of ash and epoxy resin. Photo by the author Making this table is a slow and quite labor-intensive process. But there are always two ways. The first is to repeat and get a stylish designer table. The second is to come up with something of your own based on this experience. I decided to make a triangular coffee table on light ash legs. The tabletop should be made of epoxy resin in contrasting colors. The picture clearly shows the table frame and the angle of the legs. Photo by the author Frame for the table I chose ash as the material for the frame. I planed and aligned the end cuts. Now the board is suitable for further work – it’s time to make the blanks. We will need three bars for the legs and three bars for the drawer. Let’s prepare the board for work. We plan and cut off the excess. Photo by the author First, we cut the board to length according to the required dimensions (the height of the legs and the width of the frame). Now we split each segment into three parts lengthwise. We get neat blanks. Features of carpentry joints The crucial point is to select grooves for connecting the drawer parts. But before you do this, you need to apply precise markings. According to my idea, the frame will be a triangle. Each of the three base elements rests on the neighboring one. This way we get a light and stylish base. The connection of parts occurs approximately in the first third of the length of the segment. I must say that this design made me think about how exactly to implement this connection so that everything would look neat on the outside, and the quality would not suffer. The problem is that not all types of connections can provide both the first and second, especially with dimensions of 2.5 × 4 cm (width and height, respectively). Not every connection can be tightened with clamps, but this is necessary when using glue. Through long discussions and reflection, a solution was found. But the situation was complicated by the fact that the groove for the connection should be at an angle. In order not to spoil the good wood, I even had to practice on pine. So, for the connection, you need to select grooves in half the tree at an angle of 60 degrees: one – at approximately 1/3 of the length, the second – on the edge. It is also necessary to cut the end of each workpiece at the same angle. I used a table saw for this and then finished the cut with a chisel. This type of joinery requires a thoughtful approach and careful execution. Photo by the author Assembling the base of the table The legs of the table, according to the idea, are slightly narrowed towards the bottom. We saw off the excess and give it the desired shape. We give the legs a shape. Photo by the author The legs are attached to the drawer at an angle. We mark the parts and cut off the excess at the fastening point, as well as at the bottom of the leg – so that our table is stable. All parts must be sanded. An oscillating spindle-belt grinding machine simplifies and speeds up the process. You also need to round the edges of the legs. We connect the legs and the drawer using dowels. We drill matching holes in each part. We hammer in the dowels. We strengthen the fastening with glue. We connect the table legs with the drawer. Photo by the author We also assemble the underframe using glue. We coat each groove, join the parts, and clamp them with clamps. Assembling the base. Photo by the author The base for our table is ready. All that remains is to coat it with oil. I used wood oil and wax. After drying, the frame is ready for use. Meanwhile, we also need to make a tabletop. Plywood base for an epoxy tabletop First, we’ll make an insert from 1.5 cm plywood. Cut out a triangle. But since our table will have rounded corners, we will give the insert a similar shape, that is, we will cut off each corner and sand the edges. Let’s cover it with acrylic paint on all sides. Mine is white. When the composition dries, remove the chamfers. Let’s prepare the plywood insert. Let’s cut off the corners. Photo by the author We will immediately prepare the loading area. It is needed to prevent the insert from floating in the thickness of the epoxy resin. To do this, we use a piece of plywood and special pyramids. The bottom line is that the area of contact of such a weight with the surface will be minimal, and it can be easily removed, even if resin gets on the surface. The weight will prevent the plywood from floating. Photo by the author To fill, we need formwork. Let’s make it from laminated chipboard. To do this, we will apply markings to our future tabletop on a sheet of chipboard. Let’s cover the surface with wax so that after drying the epoxy resin can be easily separated from the formwork. Now we will make the sides along the marking line. I secured the formwork walls with an oblique screw. The formwork must be reliable and the seams must be sealed. Photo by the author We place a plywood insert inside the formwork. We align it with the walls of the formwork. We install a weight on it, on which we place something heavy. For example – blocks. All joints, including those around the perimeter of the insert, must be sealed with sealant. If this is not done, the epoxy will spread, and the entire work will be ruined, as will everything around on which this resin spills. We coat all surfaces with wax. We use a sealant to prevent the epoxy resin from leaking out. Photo by the author How to work with epoxy resin Now we mix the epoxy composition. Please note: it consists of two components. To get a good result, you need to mix the components for a long time and thoroughly. Moreover, after mixing in one container, you should pour it into another and mix again. Since I want to get a certain pattern, I will use special pigments. They also need to be mixed into the composition for a long time and thoroughly so that the color is uniform. The main color of the tabletop is white. Photo by the author The main color in my case is white. Mix the components and colors, pour the first layer. It should be approximately 1.5 cm, that is, be flush with the plywood insert. After 3-4 hours, remove the weight and prepare mixtures of three contrasting colors. Fill it with white again. The layer thickness is 0.5 cm. Using contrasting colors, we form a pattern. We slightly blur the boundaries of the color lines with a hairdryer. This is not a construction hair dryer, but a very ordinary hair dryer. After 18 hours, the formwork can be removed. Using colors we create a drawing. Photo by the author Refining the tabletop We make a template for the future tabletop from paper. Using it, we cut out a template from plywood 6 mm thick. We bring it to mind, polish the edges. This is our standard. Now we put it on the epoxy cloth, outline it, and remove the excess with a jigsaw. Using double-sided tape, we fix the plywood on the tabletop and adjust the epoxy sheet to size exactly according to the template. Once the shapes are completely aligned, the plywood can be removed. We grind the tabletop, chamfer it, polish it and cover it with acrylic varnish in 3 layers. We also sand and polish the varnish on top using polishing paste. Important! While sanding, pour water onto the surface and move along the surface without pausing so as not to melt the hardened epoxy resin. A plywood template will help give the epoxy sheet the desired shape. Photo by the author The final stage is to attach the base to the tabletop. To do this we use a Euroscrew. We fix the tabletop to the base. Photo by the author Working with epoxy resin requires certain knowledge. In order not to miss important nuances, I highly recommend watching our video instructions.
Source
223
