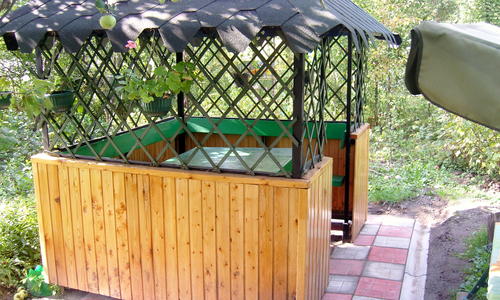
A small gazebo made by yourself may not look too luxurious, but it will decorate a modest plot of six acres and allow you to fully relax after working in the garden. Relaxing in such a gazebo on a hot day is a pleasure! At our dacha, which is located not far from Tula, in the local area there is a place to relax – a small metal table and two benches. It is clear that you cannot sit on them when it rains. This is probably why the idea arose to build a light gazebo. Our site is small and developed, there is not much free space. Therefore, we decided to make the gazebo compact, and to make it last a long time, we made its frame from a metal corner. For the corner posts I took a 75 × 75 mm corner, and for the remaining elements I took a 50 × 50 mm corner. To finish the fence I used eurolining, and built the tabletop from tongue-and-groove boards. But I really wanted to make the roof original. The following tools were needed:
- tape measure (5 m), ruler;
- bubble building level;
- construction level with a magnetic side for working with metal surfaces;
- welding machine from Blueweld (Italy);
- angle grinder (with disc Ø 115 mm);
- 300 W drill with variable speed control;
- hacksaw.
Making the frame Previously, I marked the position of the two corner posts of the doorway and the installation locations for the table and benches. For the stability of the structure, all racks were concreted (Fig. 1a). To do this, I made holes 75 cm deep with a mechanical drill Ø 25 cm. For concreting, I used a mixture of cement, sand and crushed stone of a fraction of 20–40 mm in a ratio of 1: 2: 1.5. It was important to check the verticality of the stands, for which I used a level with magnets, which allow you to securely fix the tool on the stand made of angle steel, freeing your hands. Rice. 1. a) The basis of the gazebo structure is frame posts, concreted in holes 75 cm deep: 1 – corner 50 x 50 mm; 2 – block 50 x 100 mm; 3 – block 50 x 50 mm; 4 – lining; 5 – paving slabs; 6 – gutter; 7 – “torment”; 8 – crushed stone; 9 – concrete base. b) Welded gazebo frame: 1 – corner posts from a corner 75 × 75 mm; 2 – frame elements from a corner 50 x 50 mm; 3 – concreted sections of corner 75 × 75 mm When the concrete at the base of the corner posts had set, I used a grinder to cut the corners, which were supposed to serve as elements of the upper, middle and lower frames. First, I welded the steel corners of the top frame around the perimeter of the gazebo, trying to ensure the rectangularity of the resulting frame. After that, I welded the corners of the middle and lower trims. Perpendicular to the sides of the top binding, I fixed the 50 × 50 mm corners crosswise, and fixed the stand vertically in the center of the crosshair. Then I attached 4 diagonal rafters to its top (Fig. 1b). The corners were mounted in such a way that the shelf of the corner was facing upward. I did not make the pillars of the doorway right away, but “monolithized” pieces of 75 × 75 mm corner so that they protruded above the supports by about 5 cm. When making the frame, I welded the pillars of the opening to them from a 50 × 50 mm corner. To protect metal surfaces from corrosion, I covered them in two layers of black oil paint (MA-115), allowing the first layer to dry thoroughly. I welded the doorway post to a piece of corner, which I fixed in the concrete base. Many summer cottages have one common drawback – the supply voltage is noticeably less than 220 volts. When working with electric welding, this is simply a disaster. An easy way to avoid inconvenience is to work with welding equipment early in the morning, when everyone is still sleeping and the load on the electrical network is minimal. That’s exactly what I did. Sheathing To attach the sheathing elements and roof parts made of dense fiberboard, I first attached wooden blocks with a cross-section of 40 × 40 mm to the metal elements of the gazebo frame. I used Ø 3.5 × 35 screws, which I screwed from the inside through the holes in the metal corners. Triangular blanks for the roof slopes were marked using a cardboard template. Using a saw with a straight, fine tooth, I cut blanks from dense fiberboard. The cut blanks were attached to bars screwed to the metal inclined ribs (corners) of the roof. Roofing made of flexible tiles I didn’t choose the roofing material right away – I looked at many different options in magazines. In the end, I decided on flexible tiles – there are inexpensive domestically produced bitumen tiles on sale. As a roof I used soft tiles of domestic production. The basis for the flexible tiles on the roof of the gazebo is uncoated roofing felt, glued to the fiberboard using bitumen mastic (Fig. 2). I also glued the flexible tile tiles onto bitumen mastic, nailing them in the overlap areas with small galvanized nails Ø 0.5 × 20 with round heads. I glued it starting from the bottom edge of the slope, overlapping the glued bottom row with the top row. Rice. 2. Roofing: 1 – sheathing; 2 – roofing felt; 3 – dense fiberboard; 4 – roofing felt glued with bitumen mastic; 5 – soft tiles glued to the roofing felt with bitumen mastic and fixed in places of overlap with nails. Fencing. The fencing sheathing bars were placed on the corners of the frame from the outside, pulling them to the corner with screws from the inside. For the cladding I used clapboard pre-painted with two layers of blue ML paint. The lining was nailed to the sheathing with galvanized nails Ø 1.0 × 20 mm with small heads. Along the perimeter of the fence I nailed handrails made of planed bars with a cross-section of 50 × 100 mm. The handrails and fencing trim were coated with three layers of durable, colorless furniture varnish. At the top of the fence I installed sliding green trellises, cutting them to fit the openings, and screwed them to the slats on top of the handrails. Gazebo floor For paving the floor and making a blind area, I used paving slabs (300 × 300 mm) in two colors, laying them in a checkerboard pattern. When preparing the base, I selected a layer of soil ~5 cm thick inside the gazebo, and then leveled the surface in a horizontal plane. I laid a layer of crushed stone (~ 3 cm) and compacted it thoroughly. The floor of the gazebo was laid out with paving slabs of two colors. Tiles around the perimeter, laid with an outward slope, act as a blind area. The water flowing from them enters the gutter and is diverted away from the gazebo. After this, a layer (~ 3 cm) of the so-called “flour” (finely crushed industrial slag) was poured with the addition of cement grade M 400 (approximately 10% of the volume). You can also use river sand. When laying paving slabs, I used a rubber mallet and a building level 500 mm long. There was practically no need to cut tiles. After laying the floor, I spilled plenty of water on the tiles, and after drying, I swept away the remaining “flour”. On the outside of the gazebo, the covering was laid with an outward slope – it serves as a blind area (Fig. 1). The water flowing from them during rain falls into the gutter and is removed from the gazebo. Table and benches As the legs of the benches and the support for the table, I used pieces of Ø 55 mm pipes with 50 × 50 mm corners welded to them. Inside the gazebo, along the walls, I built benches made of planed boards with a cross-section of 50 × 250 mm. The supports for them are scraps of wood, which are screwed to the corners welded to the legs of the benches. In the corners, the boards of the benches are joined at the edges. The table and benches in the gazebo were covered with protective paint in two layers. A metal sheet with a thickness of 3.0 mm and dimensions of 450 × 650 mm was welded to the concreted table stand for fastening the tabletop. I attached bars to the sheet with screws from below through drilled holes, onto which I filled the tongue-and-groove planked boards of the tabletop. After sanding the surface of the tabletop, I painted it green and then coated it with colorless wood varnish with intermediate sanding. At the request of my wife, I attached hanging pots with petunias along the edges of the roof for beauty. How nice it is now to sit in a gazebo on a warm summer evening with a cup of hot aromatic tea from a samovar! The soul rejoices! Text and photo: A. Nefedov. Drawings: V. Voronin.
Source