In order to create a feeling of unity with nature in your interior, it is not necessary to replace all the carpet paths with rolled lawn; it is enough to simply add more natural materials to your surroundings. Stone is an ideal coating for naturalistic decoration of walls and floors, and stone mosaics, whether in a natural color or painted in any palette, remain not only durable, but also a very effective way to decorate the interior.
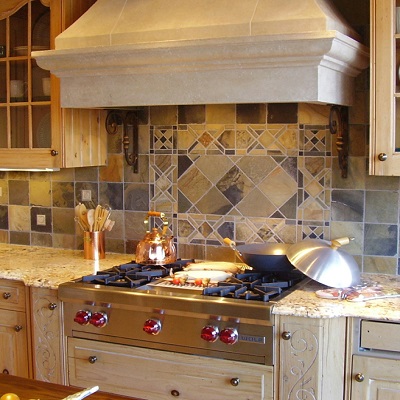
Natural stone mosaic tiles
Stone mosaics are probably the very first type of coating for interior design that was used by man. Pieces of natural stone of various textures and colors were first used by the Romans, who lined the rooms of the nobility with precious and semi-precious stones. Nowadays, you can no longer see rubies and sapphires embedded in the wall, but stone mosaics are still relevant today.
Of course, natural mosaic made from natural stone is not a cheap pleasure, and therefore laying it on walls from floor to ceiling will cost a pretty penny. On the other hand, with the right budget allocation in interior design, almost anyone can afford an apron made of stone tiles over the kitchen or bathroom work surface. No matter how prohibitive the price for the material and its layout may seem, there is no doubt that the stone mosaic will serve you for decades. In addition, it is very easy to wash, it does not fade, and retains its texture and strength for a long time.
Stone mosaic patterns can find a place in any interior: classic marbled mosaics, chiseled tiles reminiscent of minimalist brickwork that they forgot to putty, or gray abstract boulders in high-tech – stone will find its place in any home.
Laying mosaics from natural stone
If you are not afraid to work with expensive material yourself, then laying mosaics from natural stone can be done without the help of professionals. This procedure is especially easy with stone mosaics already glued to a mesh base – working with one whole layer will be much easier than laying out single tiles.
First of all, make sure the surface is smooth, clean and dry so that there is maximum adhesion between the tiles and the wall. After leveling and drying the walls, apply a thin layer of adhesive to the surface of the wall using a spatula, making sure that there is no excess, otherwise the adhesive solution may get onto the surface of the stone and ruin its appearance. After applying the glue, carefully transfer the stone to the wall and, pressing down, fix it. After the glue has dried, all that remains is to smooth the seams with a rubber spatula using decorative grout to match the color. Periodically wipe off any remaining grout from the tiles with a sponge until the material dries. Rub the seams with a damp sponge to get rid of excess relief, wait about half an hour, and then go over them with an additional dry cloth.

|

|

|
Self-adhesive natural stone mosaic
A much more convenient and less labor-intensive process would be to lay mosaics on a self-adhesive base. Instead of the usual adhesive solution, which can ruin the surface of the stone if it gets on it, there is a special strip of adhesive tape on the back surface of the tiles. After getting rid of the protective film, the tile patterns can be immediately transferred to the wall, without fear of the glue hardening too quickly or getting dirty. Next, all that remains is to grout the seams as usual, and you can enjoy the beauty of natural stone mosaics.

|

|

|

|

|

|